Showing posts with label table. Show all posts

Wednesday, September 23, 2015

Ancient Well


This will be my first Malifaux/Frostgrave crossover terrain piece.

 Supplies Suggested:

Small lid -- the lids from mini cups are perfect. Diamond sells a bagof 50 cups with lids are the greatest for various projects.  If you can’t find a bag of mini cups, the local take-out or salad bar has them.  Order a salad with dressing on the side and you will have what you need after a healthy lunch! (Make sure you wash the cup and lid well if repurposing)

Wax paper  -- Protects your work surface and allows your glue to dry evenly.  I like the results much better than newspaper, but reusing the flyers they endless stuff in your mailbox are an ok substitute.

Small stones – I bought a bag of gravel from the local hardware store.  The gravel is various sizes, but for this project I pick out stones that are big enough to fit 3-4 onto a penny.  This creates a scale where it seems feasible the stones were hand carried to site and manually assembled.  This well is going to look ancient, but can also be used in settings where it looks like the denizens did the best they could with the material at hand.

Wood Glue – Flexible and strong.  A little more expensive than White glue, but a bit cheaper than Hot glue and I prefer than either when it comes to gravel.

Paint --  I am picturing this being used for Frostgrave mostly, so I imagine grey stone.  Inexpensive, Craft acrylic paints in Black, White and Grey. 

Spackle – This is the mortar.  Get a tub of spackling paste from your hardware store, you will use a lot of it in your coming terrain projects (great for hills, cliffs, cabins, water features and basing, too!)


1.   Find a lid that is slightly smaller than you want your finished product.  Cut a piece of wax paper that will be slightly larger than your finished product.  Place the lid centered on the wax paper, with the inside facing up.  The lid is not only going to serve as the guide for your well’s circumference, but it also  holds your “water”.


2.       Squeeze your glue (I recommend wood glue over the other options) onto the wax paper around the outer edge of the lid.  This glue will not only connect the stones, but it will also bond the stones to the lids.
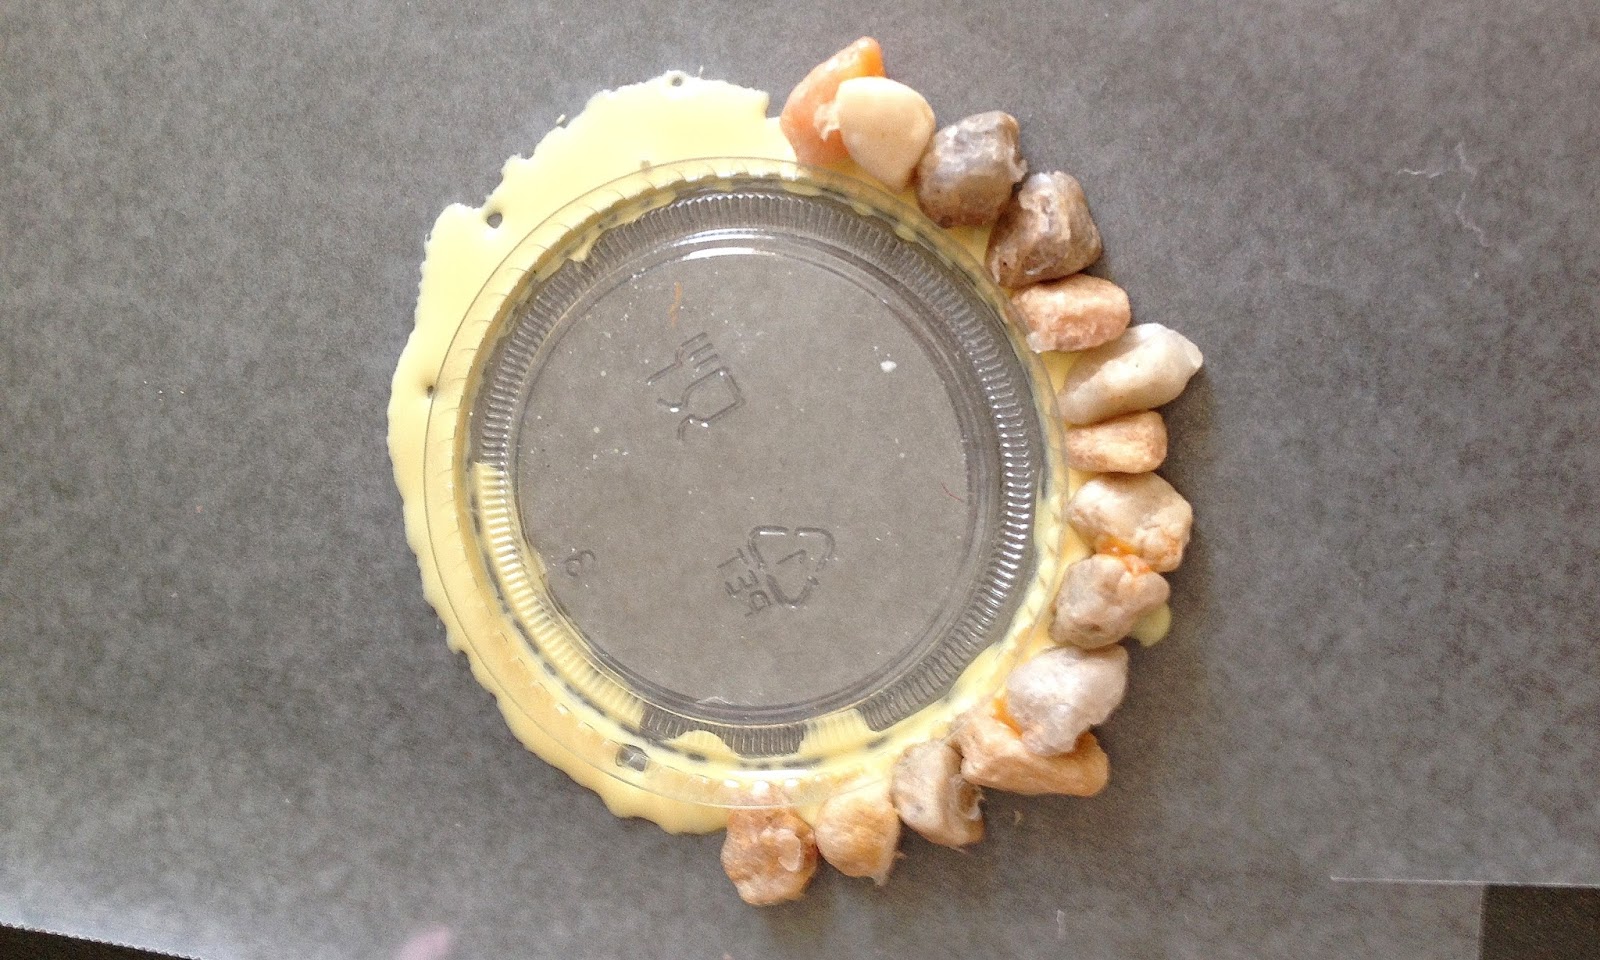


3.       Start placing your stones around the base, flush against the outside of the lid and to one another.  Do not worry about spacing them, there will be enough gaps and space due to irregular shape and roundness of the gravel.  I create an irregular base, randomly alternating between large  and medium –sized gravel pieces.  You can create a more uniformed look by just using medium -, or even two small, –sized gravel pieces deep, but I like the irregular profile and it allows the second and third level of stones to settle in interesting ways.


4.       Once you get the initial base surrounded with gravel so it looks how you want it, let the glue set. 


5.     Now comes the fun part….. Well, fun in a fiddly  I-hate-gravity way.  The second level is you finding the stones that naturally settle into the gaps created by the base layer of stones.  It doesn’t have to be perfect because you are adding the “mortar” later to fill gaps and smooth the outer and inner profile.  The second and third level are your chance to create your well’s personality.  Will the stones be of uniform size, shape, and spacing, or are some going jut out, tilt, or even be missing in places?  It all depends on the story you want the well to tell.  I went for the middle ground.  Most of my stones are the same size, but some stick out more than others and some are rounded and others have sharp points.  I want the look that the builders had to use available material which might not have been ideal, but it was still useful and had a lasting result.  I also wanted to give the impression that the stonework was starting to shift from over the centuries so I allowed my pieces to sometimes move how gravity wanted them to settle.  I suggest letting each level settle and for the glue to set before going to the next level.  This is the project that will take a few days, but each day is only 30 minutes or so of gluing.

This is what my well looks like after the final level.  I went with 3 levels.  For 28-32 mm scale, I think anything higher seems impractical from the fluff of citizens getting water and also from a terrain perspective of giving cover, but not blocking LOS.


Next entry will discuss the addition of mortar and paint.

Let me know if I skipped anything, you have any questions, or was unclear about a step.

Have fun building your miniature world!


Saturday, August 22, 2015

4-Player Story Encounter markers

There are story Encounters that use the four suits in their set-up and the players Scenario.
Below is an image of such a game's set-up where we had to deploy four 30mm markers representing the four suits onto the table  and the players later pulled aces or jokers to see which one of the markers was their target.  If you pulled an ace, your goal was to Interact with that particular marker and then hold onto it for the rest of the game for 3 VP.  You could get another VP for grabbing one of the other Markers.  Joker meant you could grab any marker, but each one was only worth 2 VP.   Max for Scenario was 4 VP, so Schemes were still important and even more important for the player with the Joker.


Table


Deployment from Bird's-eye view.


The silver rounds on top of the 30 mm markers have 1 of the 4 suits written on them.
 Each marker was placed on the table by a player prior to drawing their Scenario win-condition.  Most placed the Markers mid-table.  The silver rounds are Fantasy Flight plastic tokens I bought on sale and they are pretty great for writing on with a dry-erase marker, but they do stand out and I am always looking to replace them with more thematic tokens when I can.

I found some cake toppers that I am in the process of staining and dinging-up to replace a the silver tokens for these Scenarios.

I am liking how they are turning out thus far:


FYI

It has been so long since the game, I do not have a Battle report, but here are the participants seen in the set-up.

Top Left:  Ten Thunders' Kang and 3 Rail Workers
Top Right:  Arcanists' Snowstorm, 2 Ice Gamin, and December Acolyte
Bottom Left:  Guild's Sadhir and 3 Westrels
Bottom Right:  Resser Valedictorian, 2 Rotten Belles, and Effigy

Guild left the game on the 3rd turn and the game ended with Arcanists and Ressers tied.
Ten Thunders could have actually won the game, but the player dedicated the crew to attacking other than following their Schemes and Scenario (I believe they pulled the Joker which meant they could get 2 VP for grabbing any of the markers).  Combat is a means to an end in this game rather than the sole purpose of the crew which I love about Malifaux.  


Wednesday, July 29, 2015

Miniatures Monday - July 27th

Miniatures Monday at Battleground Games in North Charlotte!

This was the second game for Andrew.  He just was initiated into the world of Malifaux and selected Mei Feng and her Crew Box for Arcanists as his intro. The miniatures look great and she is just amazing on the table.  I think she is the toughest Master I have had to deal with so far!  I will add my spin on the battle report in another post, but for now I wanted to share the table we played on, our deployments and a snapshot of the 6th turn when the final blow was dealt. 

Andrew and his crew of Arcanists did prevail against Seamus' band of Resurrectionists.  It was all about completing his Scenario and Scheme. Mei was a melee powerhouse the entire game so the Arcanists had 3 VP from Reckoning, while Seamus only was able to get 2 VP.  I was able to Assassinate Mei while keeping Seamus at 12 Wounds, but I failed to keep four scheme markers down on the center line for Line in the Sand - that Emberling was dropping Scheme Markers like it was getting overtime at the USPS. We shared Strategy and Schemes and had them declared since this was his second game and it is best to slowly acclimate to the rules and add the complexity in layers.  All in all, it was a great game!

Well played, Andrew, and welcome to the game!


Seamus and the beginnings of my Fox Hunt crew!

Mei and her Rail Crew!


Lots of corpses in the end.  I think Kang and the Emberling were all that remained of the Rail Crew.  Seamus and the Carrion Effigy were all that remained on my side.  I was able to summon only 3 Dead Doxies due to bad Fate hands.

Monday, July 6, 2015

Desert Terrain Pieces


Here are some of the terrain pieces on their own.  Some are in various stages of completion, but all are functional and are being used in games and demonstrations.  You can refer to the earlier post to see examples of what they look like together on a table.  They look good with or without a gaming map.  I did create a desert sand & dirt gaming mat just for Malifaux (it is big enough so I also can use it for WarmaHorde games).  Below I will give a brief comment on how I use each piece on the table for games/demos.


Pond:  Severe only
Walls:  Ht 1 Blocking, Climbable (costs 2" of movement), Hard Cover


Trees: These trees have their own amorphous bases that sit on top of some sand/dirt/grass templates to determine the area of the forest  (3rd photo, below trees and cacti, are examples of such templates)
Forest are Ht 5 Blocking, Severe, Soft Cover,
Cacti:  These can sit on top of sand/dirt/grass templates to simulate a patch of cacti that be determined as Impassable or Hazardous.  They can be placed on top of 30 mm bases or just on their washer based to create a single Hazardous piece of terrain.
Sand patch:  Can be left bare to be just Severe Terrain; place trees or other flora to create various forest terrains.


Outcrops:  The first two outcrops are small, about 4" - 7" across.  They are Ht 2 Blocking, Hard Cover.  They are stable enough to be Climbable, but I usually treat them as Impassable to encourage flanking and making hard choices (bottleneck or spread out).  The third outcrop is much larger and is definitely Climbable. There are two levels on each.  The second level provides a Vantage point.


Sunday, July 5, 2015

Desert Terrain Tables

Although I am moving towards a focus on the Resurrectionst, I decided on creating several pieces of modular terrain that will create a desert theme.  I imagine the possibility of outposts, mining camps, mines, and boomtowns.  Here are some pictures of  the table set-ups I have used for demonstrations .   The first two pictures also feature the gaming mat I made to simulate the dirt and sand of the American West.  The third picture has a piece of orange cloth as the mat that can purchased at any fabric store or even some Wal-Marts. 

I am really enjoying the desert theme; each of these tables has every type of terrain trait in Malifaux and it is a great training ground to learn the rules on.   Also, they bring back a lot of memories from my childhood growing up in California and visiting my Grandfather in Arizona.  I hated the heat of the Southwest deserts, but those deserts were beautiful beyond belief even in their stark simplicity.  I think they would have been even more awesome with giant lizardmen, evil puppets, ice constructs, and witchlings running around!


 My next post with have close-ups of terrain pieces.